Scalable Microservice with Multiple Apache Kafka Brokers with Multiple ZooKeeper Nodes using bitnami/kafka:3.4 docker image with kafkajs node package — PART II (Project structure and using KafkaJS)

This is a continuation of PART-I (Introduction and motivation). In this article I will explain how the project structure goes on and how KafkaJS npm package used. I’m only giving a basic steps to integrate these technologies to microservices. So not all the files and all the way is mentioned. Lets get into the point directly without additional chit chats.
Before that here is the guide for this article.
- Overall project structure.
- Kafka client, producer and consumer configurations and codes.
- Main server file configuration.
Overall project structure.
First we have to create two microservices to demonstrate this system. I created projectmanagement and projectmanagementcopy as services.
Here is the projectmanagement service folder structure looks like after implementation.
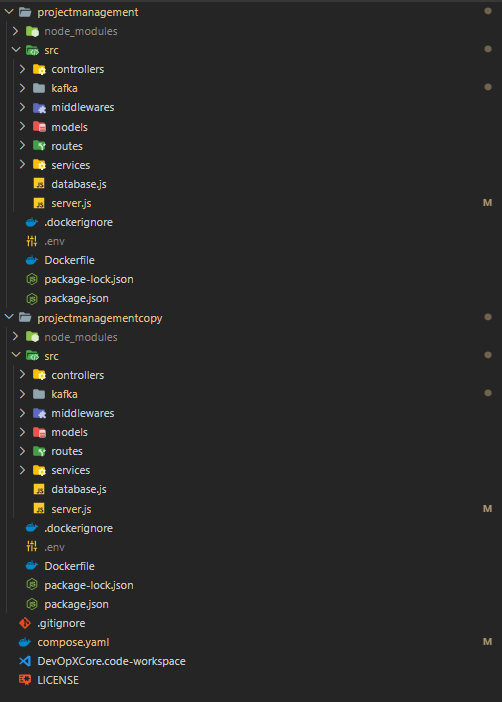
So I will go through the main steps in here. Here I used MVC architecture for each of services. Also server.js is the main file and the database.js file is the file which connects and configures MongoDB database for my application. Other folders are in the normal standard way of the MVC architecture. Here I’m gonna talk about main files which are crucial to this task. Which are,
- kafka folder — Consists of client.js, consumer.js, producer.js
- server.js file
- Dockerfile
- .dockerignore
- compose.yaml (docker compose file)
Kafka client, producer and consumer configurations and codes
Here is the structure of the kafka folder,
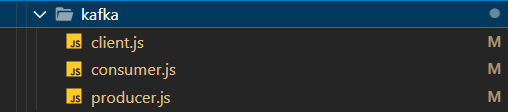
So here,
- client.js — For configuring admin client
- consumer.js — For configuring the consumer, connecting to a consumer, subscribing to a consumer and for running a consumer for the subscribed topic
- producer.js — For configuring the producer, connecting the producer and for running the producer
Lets go with each of services,
First projectmanagementservice,
Here is the code for the client.js file
const { Kafka } = require('kafkajs');

const kafka = new Kafka({
  clientId: 'projectManagementService',
  brokers: ['kafka1:9092', 'kafka2:9092'],
  enforceRequestTimeout: true,
  connectionTimeout: 20000,
});
const admin = kafka.admin();
const createTopics = async () => {
  try {
    await admin.connect();
    await admin
      .createTopics({
        waitForLeaders: true,
        timeout: 30000,
        topics: [
          {
            topic: 'test-topic',
          },
        ],
      })
      .then(() => {
        console.log('Topic created successfully');
      });
    await admin.disconnect();
  } catch (error) {
    console.error('Client admin creation error: ', error);
  }
};
module.exports = { kafka, createTopics };
So this code basically do is, in here we create a new instance of Kafka with parameters clientId, brokers, enforceRequestTimeout, connectionTimeout. Let me explain what those parameters for,
- clientId — You can select a any name you want (logical identifier) for the service or for your application
- brokers —List of internal hosts of Kafka brokers
- enforceRequestTimeout — You can enable or disable request time out.
- connectionTimeout — Time that you have to wait for a successful connection(in milliseconds)
- topics — List of names of topics
After creating Kafka instance you can call the admin client. Then admin client I created a function for creating topics. In that function admin client connecting, topic creation and admin client disconnecting happens. When creating topics there are several configurations given. Let me explain them.
- waitForLeaders — Wait until a leader is available. This reduces of having LEADER_NOT_AVAILABLE error.
- timeout — Time needed to create a topic (milliseconds)
As best practices its good to disconnect from the admin client after creating the client. So it will save resources and and also it will do a clean shutdown. After that kafka instance and the function for topic creation is exported from this file.
Code for the producer.js file
const { kafka } = require('./client');

const consumer = kafka.consumer({ groupId: 'test-group' });
const consumerConnect = async () => {
  try {
    await consumer.connect().then(() => {
      console.log('Consumer connected successfully');
    });
  } catch (error) {
    console.error('Consumer subscribe error:', error);
  }
};
const consumerSubscribe = async () => {
  try {
    await consumer
      .subscribe({ topic: 'test-topic', fromBeginning: true })
      .then(() => {
        console.log('Consumer subscibed successfully');
      });
  } catch (error) {
    console.error('Consumer start error:', error);
  }
};
let isConsumerRunning = false;
const consumerRun = async () => {
  try {
    if (isConsumerRunning) {
      console.warn('Consumer is already running. Skipping start.');
      return;
    }
    await consumer
      .run({
        partitionsConsumedConcurrently: 3,
        eachMessage: async ({ topic, partition, message }) => {
          console.log({
            topic: topic,
            prtition: partition,
            value: message.value.toString(),
          });
        },
      })
      .then(() => {
        isConsumerRunning = true;
      });
  } catch (error) {
    console.error('Consumer run error:', error);
  }
};
module.exports = { consumerConnect, consumerSubscribe, consumerRun };
In here first we have to get the client instance we created earlier. From that we can create a consumer with a group id. So groupIdparameter is important because its used to determine which consumers belong to which group.
After that I created a function to connect the consumer. In there consumer is connecting and the error handling is managed.
Next function is for consumer subscription. From this one we can subscribe to a topic sucessfully with these parameters that I have used.
- topic — Topic name that you want to subscribe
- fromBeginning — This means if a consumer group is starting to read messages from a Kafka topic and doesn’t have a specific starting point, it will begin processing messages from the very beginning of the topic
I created a isConsumerRunning ariable to ensure the consumer running for once. In the consumerRun function if a the consumer is already running it skips with a log and if its not then the consumer will run. So there are parameters given to run the consumer.
- partitionsConsumedConcurrently — This enable the consumer to process up to three messages concurrently from the same partition, enhancing message processing efficiency. This allows for a more streamlined and faster handling of Kafka messages by allowing parallel processing within a specified partition
- eachMessage — The eachMessage handler in KafkaJS simplifies message processing by feeding your function one message at a time, automatically handling offset commits and heartbeats at the specified interval, making it an easy starting point for Kafka consumer implementation. In this callback we get topic, partition, messageas parameters and we can access those values from that
Then we can export consumerConnect, consumerSubscribe, consumerRun functions which we created.
Code for the producer.js file
const { kafka } = require('./client');
const { Partitioners } = require('kafkajs');

const producer = kafka.producer({
  createPartitioner: Partitioners.LegacyPartitioner,
});
const producerConnect = async () => {
  try {
    await producer.connect().then(() => {
      console.log('Producer connected successfully');
    });
  } catch (error) {
    console.error('Producer connecting error:', error);
  }
};
const producerRun = async () => {
  try {
    await producer
      .send({
        topic: 'test-topic',
        messages: [{ value: 'Hello KafkaJS user!' }],
      })
      .then(() => {
        console.log('Producer sent the message');
      });
  } catch (error) {
    console.error('Producer error:', error);
  }
};
module.exports = { producerConnect, producerRun };
Here kafka client and the Partitioners are imported. First we create a producer with LegacyPartitioner. The Partitioners.LegacyPartitioner value indicates that you are using the legacy partitioning strategy for message distribution.
With the producerConnect function connecting producer and the error handlings are done. So with the producerRun function can send an event to a topic. When sending event to a topic these parameters are used.
- topic — The topic name you want to send a event
- messages — List of events that you want to send
After that producerConnect, producerRun functions are exported.
Secondly projectmanagementcopy service,
In here all the producer, consumer codes are same the only part is different is,
In the client.js file the ClientID is different. Others as mentioned earlier.
const kafka = new Kafka({
  clientId: 'projectManagementCopyService',
  brokers: ['kafka1:9092', 'kafka2:9092'],
  enforceRequestTimeout: false,
  connectionTimeout: 20000,
});
Main server file configuration
Note: projectmanagement service is in here acting like a producer only end and projectmanagementcopy in here acting like a consumer only end.
So First analyse the code for projectmanagement service
const express = require('express');
const compression = require('compression');
const bodyParser = require('body-parser');
const cors = require('cors');
const database = require('./database');
const projectManagementRoute = require('./routes/projectRoutes');
const { createTopics } = require('./kafka/client');
const { producerConnect, producerRun } = require('./kafka/producer');

const app = express();
const PORT = process.env.PORT || 4000;

app.use(cors());

app.use(compression());

createTopics();
producerConnect();

app.use(bodyParser.json());

database.connectMongoose();

app.use('/projectManagement', projectManagementRoute);

app.get('/kafka', (req, res) => {
  producerRun();
  res.send('Welcome!!!');
});

app.listen(PORT, () => {
  console.log(`Application is running on port ${PORT}`);
});
Here as usual steps the node.js express server.js file is created. Let me explain about the Kafka part. Here first we call createTopics function to create topics and then we connect the producer with the help of producerConnect function. After that GET request is made to the /kafka endpoint, it triggers the execution of producerRun function to run the producer.
Lets go to the code for projectmanagementcopy service,
const express = require('express');
const compression = require('compression');
const bodyParser = require('body-parser');
const cors = require('cors');
const database = require('./database');
const projectManagementRoute = require('./routes/projectRoutes');
const {
  consumerConnect,
  consumerSubscribe,
  consumerRun,
} = require('./kafka/consumer');

const app = express();
const PORT = process.env.PORT || 4001;

app.use(cors());

app.use(compression());

consumerConnect();
consumerSubscribe();

app.use(bodyParser.json());

database.connectMongoose();

app.use('/projectManagement', projectManagementRoute);

app.get('/', (req, res) => {
  res.send('Welcome to DevOpXCore');
});

app.get('/kafka', (req, res) => {
  consumerRun();
  res.send('Welcome!!!');
});

app.listen(PORT, () => {
  console.log(`Application is running on port ${PORT}`);
});
Here first we connect to the consumer by using consumerConnect function and then subscriber to a topic by using consumerSubscribe function. After that GET request is made to the /kafka endpoint, it triggers the execution of consumerRun function to run the consumer.
So here is how you can create producers, consumers, clients between microservices using KafkaJS npm package.
Next
In the next part we will discuss how dockerFiles are configured for each of services and how docker compose file configured for bitnami/kafka:3.4 image which multiple ZooKeepers and multiple kafka brokers.
See you soon… Stay tuned! Stay happy! Stay healthy! Stay motivated! Please give a clap 👏🏻 if you like this article and also if its useful. Thank you :)